DOM scripting introduction
When writing web pages and apps, one of the most common things you'll want to do is change the document structure in some way. This is usually done by manipulating the Document Object Model (DOM) via a set of built-in browser APIs for controlling HTML and styling information. In this article we'll introduce you to DOM scripting.
Let's provide a brief recap on the Document Object Model (DOM), which we also looked at earlier in the course. The document currently loaded in each one of your browser tabs is represented by a DOM. This is a "tree structure" representation created by the browser that enables the HTML structure to be easily accessed by programming languages — for example the browser itself uses it to apply styling and other information to the correct elements as it renders a page, and developers like you can manipulate the DOM with JavaScript after the page has been rendered.
<!doctype html>
<html lang="en-US">
  <head>
    <meta charset="utf-8" />
    <title>Simple DOM example</title>
  </head>
  <body>
    <section>
      <img
        src="dinosaur.png"
        alt="A red Tyrannosaurus Rex: A two legged dinosaur standing upright like a human, with small arms, and a large head with lots of sharp teeth." />
      <p>
        Here we will add a link to the
        <a href="https://www.mozilla.org/">Mozilla homepage</a>
      </p>
    </section>
  </body>
</html>
The DOM on the other hand looks like this:
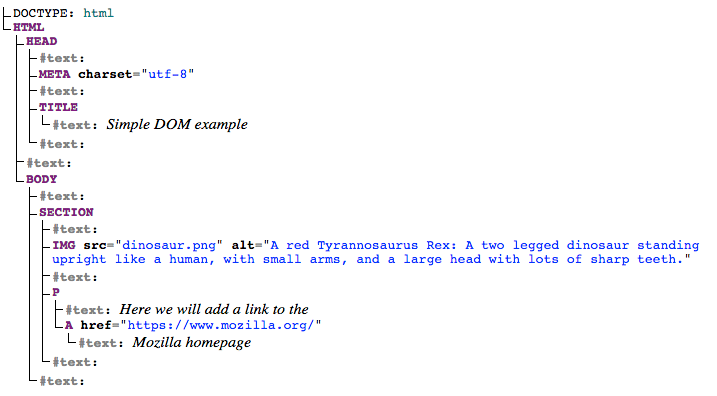
Each entry in the tree is called a node. You can see in the diagram above that some nodes represent elements (identified as HTML, HEAD, META and so on) and others represent text (identified as #text). There are other types of nodes as well, but these are the main ones you'll encounter.
odes are also referred to by their position in the tree relative to other nodes:
- Root node: The top node in the tree, which in the case of HTML is always the
HTMLnode (other markup vocabularies like SVG and custom XML will have different root elements). - Child node: A node directly inside another node. For example,
IMGis a child ofSECTIONin the above example. - Descendant node: A node anywhere inside another node. For example,
IMGis a child ofSECTIONin the above example, and it is also a descendant.IMGis not a child ofBODY, as it is two levels below it in the tree, but it is a descendant ofBODY. - Parent node: A node which has another node inside it. For example,
BODYis the parent node ofSECTIONin the above example. - Sibling nodes: Nodes that sit on the same level under the same parent node in the DOM tree. For example,
IMGandPare siblings in the above example.
It is useful to familiarize yourself with this terminology before working with the DOM, as a number of the code terms you'll come across make use of them. You'll also come across them in CSS (e.g. descendant selector, child selector).
Creating and placing new nodes
const sect = document.querySelector("section");
const para = document.createElement("p");
para.textContent = "We hope you enjoyed the ride.";
sect.appendChild(para);- Start by grabbing a reference to our
<section>element - Create a new paragraph using
Document.createElement()and give it some text content in the same way as before. - append the new paragraph at the end of the section using
Node.appendChild().
Removing elements
Removing a node is pretty simple as well, at least when you have a reference to the node to be removed and its parent. In our current case, we just use Node.removeChild(), like this:
sect.removeChild(linkPara);When you want to remove a node based only on a reference to itself, which is fairly common, you can use Element.remove():
linkPara.remove();Manipulating styles
It is possible to manipulate CSS styles via JavaScript in a variety of ways.
To start with, you can get a list of all the stylesheets attached to a document using Document.stylesheets, which returns an array-like object with CSSStyleSheet objects. You can then add/remove styles as wished. However, we're not going to expand on those features because they are a somewhat archaic and difficult way to manipulate style. There are much easier ways.
The first way is to add inline styles directly onto elements you want to dynamically style. This is done with the HTMLElement.style property, which contains inline styling information for each element in the document. You can set properties of this object to directly update element styles.
As an example, try adding these lines to our ongoing example:
para.style.color = "white";
para.style.backgroundColor = "black";
para.style.padding = "10px";
para.style.width = "250px";
para.style.textAlign = "center";
Now we'll turn to a very useful method for general HTML manipulation — Element.setAttribute() — this takes two arguments, the attribute you want to set on the element, and the value you want to set it to. In this case we will set a class name of highlight on our paragraph:
para.setAttribute("class", "highlight");