Using CSS, you can control exactly how HTML elements look in the browser, presenting your documents to your users with whatever design and layout you like.
Browser default styles
The browser will style HTML documents using an internal default stylesheet. This ensure that headings are larger than normal text, links are highlighted, and structures such as list and tables are understandable.
CSS syntax basics
CSS is a rule-based language — you define rules by specifying groups of styles that should be applied to particular element or groups of elements on your web page.
For example, you might decide to style the main heading on your page as large red text. The following code shows a very simple CSS rule that would achieve this:
h1 {
  color: red;
  font-size: 2.5em;
}
Let's dissect the CSS code for red paragraph text to understand how it works:
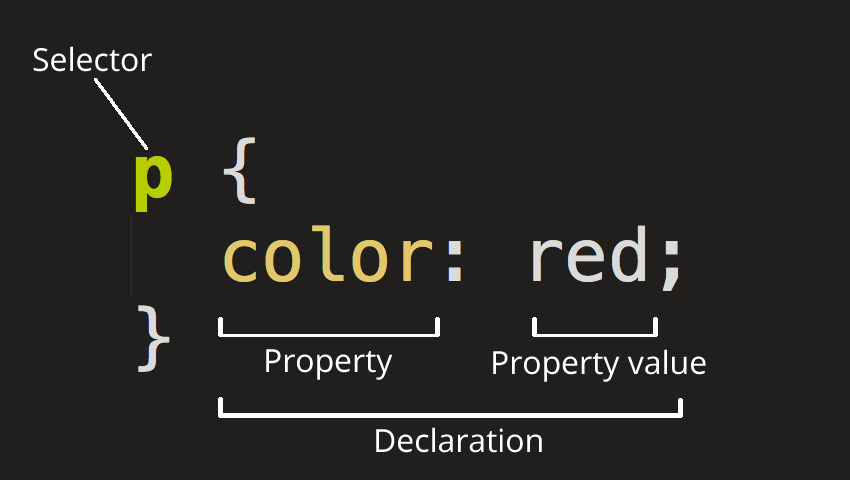
- Selector: This is the HTML element name at the start of the ruleset. It defines the element(s) to be styled (in this example,
<p>elements). To style a different element, change the selector. - Declaration: This is a single rule like color: red;. It specifies which of the element's properties you want to style.
- Properties: These are features of an HTML element that you can change the values of, to make it styled differently. (In this example, color is a property of the
<p>elements.) In CSS, you choose which properties you want to affect in the rule. - Property value: To the right of the property—after the colon—there is the property value. This chooses one out of many possible appearances for a given property. (For example, there are many color values in addition to red.)
Ways to include CSS in your document
External stylesheet : attach a separate document in the <head> of your HTML.
<link href="css/styles.css" rel="stylesheet" />Internal stylesheet or embedded stylesheet : Include styles in the <style> tag in the <head> of your HTML
<style>
    body {
        font-family: Arial, Helvetica, sans-serif;
    }
</style>
Inline styles : occur in the HTML tag itself
<p style="color: purple;">I am a purple paragraph!</p>CSS Selectors
A CSS selector is the first part of a CSS Rule. It is a pattern of elements and other terms that tell the browser which HTML elements should be selected to have the CSS property values inside the rule applied to them. The element or elements which are selected by the selector are referred to as the subject of the selector.
Type selectors
A type selector is sometimes referred to as a tag name selector or element selector because it selects an HTML tag/element in your document. In the example below, we have used the span, em and strong selectors.
<h1>Type selectors</h1>
<p>
  Veggies es bonus vobis, proinde vos postulo essum magis
  <span>kohlrabi welsh onion</span> daikon amaranth tatsoi tomatillo melon azuki
  bean garlic.
</p>

<p>
  Gumbo beet greens corn soko <strong>endive</strong> gumbo gourd. Parsley
  shallot courgette tatsoi pea sprouts fava bean collard greens dandelion okra
  wakame tomato. Dandelion cucumber earthnut pea peanut soko zucchini.
</p>

<p>
  Turnip greens yarrow ricebean rutabaga <em>endive cauliflower</em> sea lettuce
  kohlrabi amaranth water spinach avocado daikon napa cabbage asparagus winter
  purslane kale. Celery potato scallion desert raisin horseradish spinach
</p>
body {
  font-family: sans-serif;
}

span {
  background-color: yellow;
}

strong {
  color: rebeccapurple;
}
Class selectors
The case-sensitive class selector starts with a dot (.) character. It will select everything in the document with that class applied to it. In the live example below we have created a class called highlight, and have applied it to several places in my document. All of the elements that have the class applied are highlighted.
Notes
- You can have multiple classes per element, and these can be used to layer on styles as required.
- You may use a class several times in a document.
- Classes are more specific than HTML elements and will generally override them.
<style>
.warning {
    color: orange;
    font-weight: bold;
}
</style>

<p class="warning">This paragraph displays a warning!</p>
ID selectors
Create an ID and attach it to an HTML tag to make the styling appear.
- You may use the ID only once per page.
- Each element may have only one ID.
- IDs are the most specific, overriding styles from elements and classes.
- IDs are not commonly used in CSS these days. They are more commonly used with JavaScript.
<style>
#danger {
    color: red;
    font-weight: bold;
    text-transform: uppercase;
}
</style>
<p id="danger">This text is uppercase, bold, and red, and you better payattention because you're in danger only once on this web page!</p>
Descendant selectors
This is a combination of one or more classes, IDs, or elements, separated by spaces, to indicate a family relationship.
<style>
.warning p {
    color: violet;
}
</style>

<article class="warning">
  <p>All paragraphs in this article will have a color of violet.</p>
  <p>This paragraph too! No more classes needed!</p>
</article>
Grouping selectors
Make all h4 AND h5 red:
<style>
h4, h5 { color: green; }
</style>

<h4>I'm Green</h4>
<h5>I'm Green Too!</h5>
Make only the h6's in <section> blue:
<style>
section h6 { color: blue; }
</style>

<section>
  <h6>I'm blue!!</h6>
</section>
<h6>I'm NOT blue</h6>
Make the h4's and h5's inside <section> pink:
<style>
section h4, section h5 { color: pink; }
</style>

<section>
  <h4>I'm pink!!</h4>
  <h5>I'm pink too</h5>
</section>
<h4>I'm NOT pink</h4>